The white balance of a camera affects how it renders colours in the recorded media. We always aim to represent the skin tones of models in the most accurate and correct way. The best way to do this is to set the white balance accurately, to match the source of dominant lighting in the scene.
For multi-camera shoots, it’s essential that both cameras white balance match each other exactly (as when customers see the edit, there will be frequent cuts between the cameras and differences between the cameras will be distracting).
It is never acceptable to use a “one push” White Balance technique when shooting with multiple cameras, because that is subjective based on what the camera sees at the moment the button is pushed. Even if care is taken to point both cameras at a grey card, the angles may affect the reading, and the software in the camera that makes this calculation is proven to be easily confused.
It is never appropriate to use Auto white balance, as the colour balance in the scene will change often, and it’s unlikely the two cameras will ever be the same.

The correct way to white balance two video cameras
There are two options to set white balance correctly:
- Set a specific kelvin value, or
- Set a lighting source type
Set a specific Kelvin value
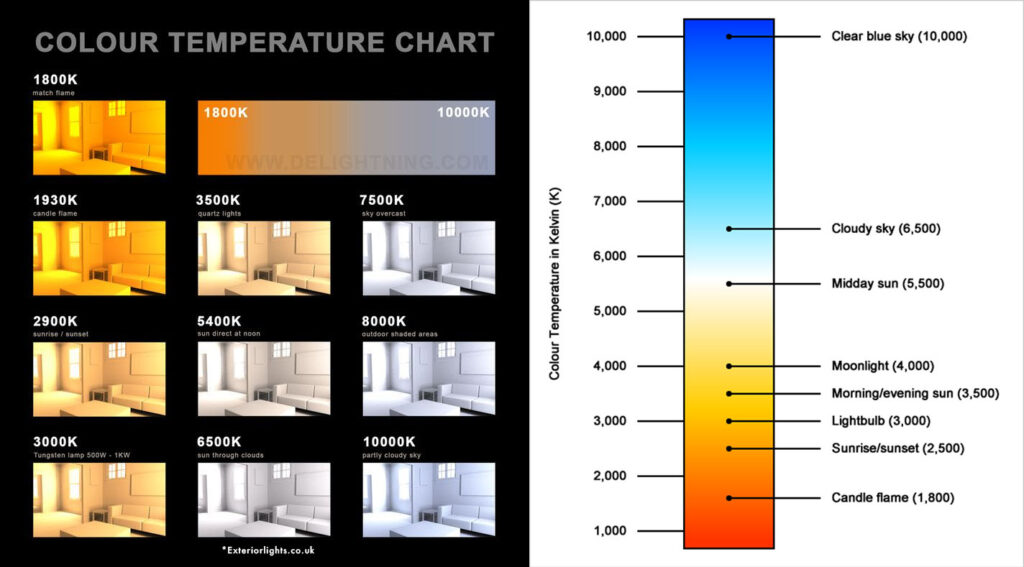
Kelvin is the measurement scale for temperature (like Celsius or Fahrenheit), measured from absolute zero. Neutral bodies at a specific temperatures emit a known certain colour of light, so this scale is universal and reliable. Lighting and camera manufacturers reference the same scale, so they are sure to match. For example;
Philips manufactures their HMI lamps to have a colour temperature of 5600K. If a scene is lit only with HMI lamps, and the camera has its White Balance set to 5600K, the colours will be rendered correctly.
Setting two cameras to a white balance point of 5600K will ensure the white balance matches between the cameras.
Setting the Kelvin is accurate – it can be adjusted in 100-degree increments from 2,400 to 10,000 – so there is a lot of fine-adjustment available. We strongly recommend using this technique.
When using this method;
- Finalise lighting the scene exactly how it will be shot
- Place a model in the scene, showing plenty of skin (eg, T-shirt and shorts)
- If there are two models in the scene with noticeably different skin tones, have both models in the scene for this
- Use one video camera, set the White Balance by setting a Kelvin value
- Start at the nominal value for the lighting source (for example, HMI light is 5600K)
- Point the camera at the model
- Assess the colour of the model’s skin in the viewfinder
- Make fine adjustments up or down until the skin looks correct
- This should take under 20 seconds
- Take note of the Kelvin set
- Set the other camera to the same White Balance
- That is, to set white balance in Kelvin
- To set the Kelvin value to the same as the first camera
If the lighting source changes significantly in the scene, this process needs to be repeated and both cameras adjusted.
Set a lighting source type
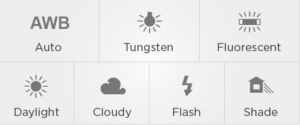
Cameras come with “presets” for types of lighting that are often used when capturing media. For example;
These are “shortcuts” for setting White Balance and can be useful. But, they are less accurate (for example, using the “fluorescent” setting might work for some tubes, but not for others – and be totally wrong for tube that look like they are flourescent but are actually LED).
These shortcuts simply reference the Kelvin scale in a “friendly” language – setting “Tungsten” is the same as setting the Kelvin to 3000K.
While using this technique will ensure both cameras are matched for white balance (assuming both cameras are set to the same preset!), we do not recommend using this approach, as it does not take into account the lighting modifiers being used – for example;
It’s rare we’d point a HMI directly at the models for a shoot!
Instead, we’d bounce the HMI off a white sheet or wall or ceiling, or shoot through a diffusion sail / lastolight.
Additionally, often part of the scene is lit by some daylight as well as the HMI.
In this scenario, setting the white balance to the “Daylight” preset would likely be incorrect, as those modifications we make to the light also change the colour temperature of the light, so the preset will not show the models skin correctly (though it may be close).

