The CX900 and FDR-AX100E are very similar Sony video cameras, the only significant difference is that the CX900 only shoots HD (1080i) and the FDR-AX100E shoots 4k. Because the CX900 only captures HD and our requirement from Jan 2021 was to capture only in 4k, this page only deals with the FDR-AX100E. Ask your contact at AWBV for a fact sheet on CX900 camera settings.
Official product manuals
We encourage SPs to review the manuals for this equipment, as they often have useful features to make capturing media easier or higher quality.
- FDR-AX100E (and CX900) video camera
- XLR-K2M (XLR-A2M) audio adapter
- Sennheiser MKH-416 mic
Video camera setup
These settings help ensure media captured with the camera meets the company’s requirements.
- Update the software in the camera
- Compare the software version in the camera with the software version that can be downloaded
- Download and install the new camera software
- Reset all settings to default first (“initialisation”) – required
- Initialising the camera ensures we are working from a “clean slate” and only the settings we want have been made.
- [Menu] – [Setup] – [ General Settings] – [Initialize] – OK
- It takes about 45 seconds
- When prompted, change these settings to the Shoot Producer’s preference
- Set language to English (or as you wish)
- Set timezone to be as appropriate for where you are
- Set Summer time as appropriate to the current time of year
- Set date & time format to be M (English)-D-Y
- Set the date and time to be correct
- When prompted to download PC software, close the ad
- Make settings required by the company
- File format
- We need to record in 4k pixel dimensions
- [Menu] – [Image Quality/Size] – [File Format] – XAVC S 4K
- More info on p121 of online manual, “File format”
- Compression
- We require the least-compressed (highest quality) video recording
- [Menu] – [Image Quality/Size] – [REC Mode] – 60 Mbps
- More info on p118 of online manual, “rec mode”
- Frame rate
- 25p is appropriate for AW scenes
- [Menu] – [Image Quality/Size] – [Frame Rate] – 25p
- More info on p119 of online manual, “Frame rate”
- Exposure
- We always want manual exposure control
- [Menu] – [Camera/Mic] – [Camera Settings] – [Exposure] – Manual
- Steady Shot on
- Removes hand-held shakiness
- [Menu] – [Camera/Mic] – [Camera Settings] – [ SteadyShot] – Active
- Note, this is not the default setting, it needs to be adjusted
- File format
- Consider changing to our recommended settings
- Dial setting
- The dial should be used to control exposure (by the iris)
- [Menu] – [Camera/Mic] – [ Camera Settings] – [Dial Setting] – Exposure
- Zebras
- Show a highlight for areas over 100% exposure (blown out). Sometimes, windows or reflections might show zebras, but this is never preferred on model’s bodies. This can mean exposure needs to be adjusted, or contrast in the scene needs to be reduced.
- [Menu] – [Camera/Mic] – [ Shooting Assist] – [Zebra] – 90%
- Beep on record and pause
- It’s less annoying if the camera does not play a tune when starting and stopping recording…
- [Menu] – [Setup] – [ General Settings] – [Beep] – Off
- Dial setting
Settings to never use for abbywinters.com shoots
These settings are never appropriate to use;
- Never use “Low Lux” function for AW shoots, unless specifically agreed with the CD
- Never use the “scene selection” function for AW shoots (presets for fireworks, sunrises, etc)
- Never use the “Picture Effect” function for AW shoots (over-saturating specific colours)
Check manual
There are numerous handy features with this newer camera, so we encourage Shoot Producers to spend a hour with the manual and camera to see what’s possible.
Setting a suitable shutter speed
Shutter speed is different to the frame rate. Here’s an excellent 10-minute video explaining the difference. The frame rate for AW videos never changes (always 50p), but the shutter speed can change when shooting. However, it actually seldom needs to, in AW videos.
A good rule of thumb is the shutter speed should be twice the frame rate – this makes video footage look “natural” and “normal” to humans.
Our frame rate is typically 25, so our shutter speed should be 50 (that is, each of the 25 frames we’re recording each second, are exposed for 1/50th of a second). This will ensure crisp images, and model moves rendered clearly.
The shutter speed should never be reduced below 1/50th (motion blur will be introduced into each frame), but increasing the shutter speed in brighter environments up to a maximim of 1/100th is always fine. Higher than that, some weird (not-preferred) changes can occur, so using the ND filter is preferred to reduce brightness and retain a sensible depth of field with the aperture.
Audio adapter settings
Defining the operations of the audio adapter. Note that audio on abbwyinters.com shoots is always recorded in mono. We will duplicate the single track recording in post production to the other channel. When two mics are used, the audio is mixed equally, and is converted to mono in the mixdown of the master edit.
-
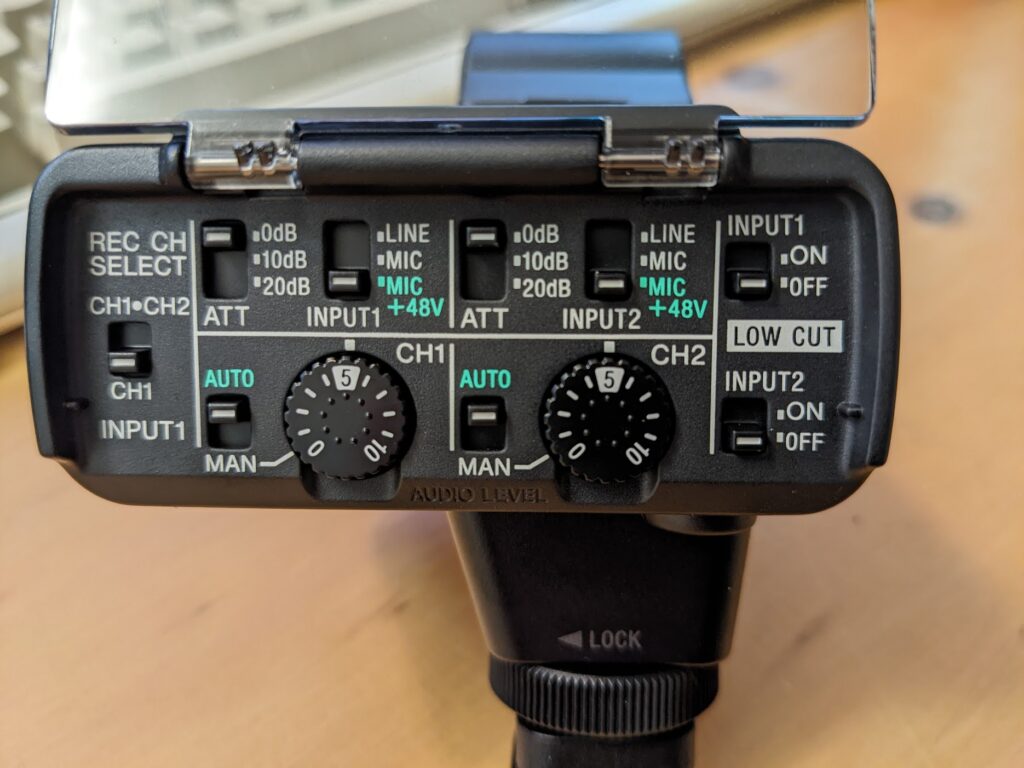
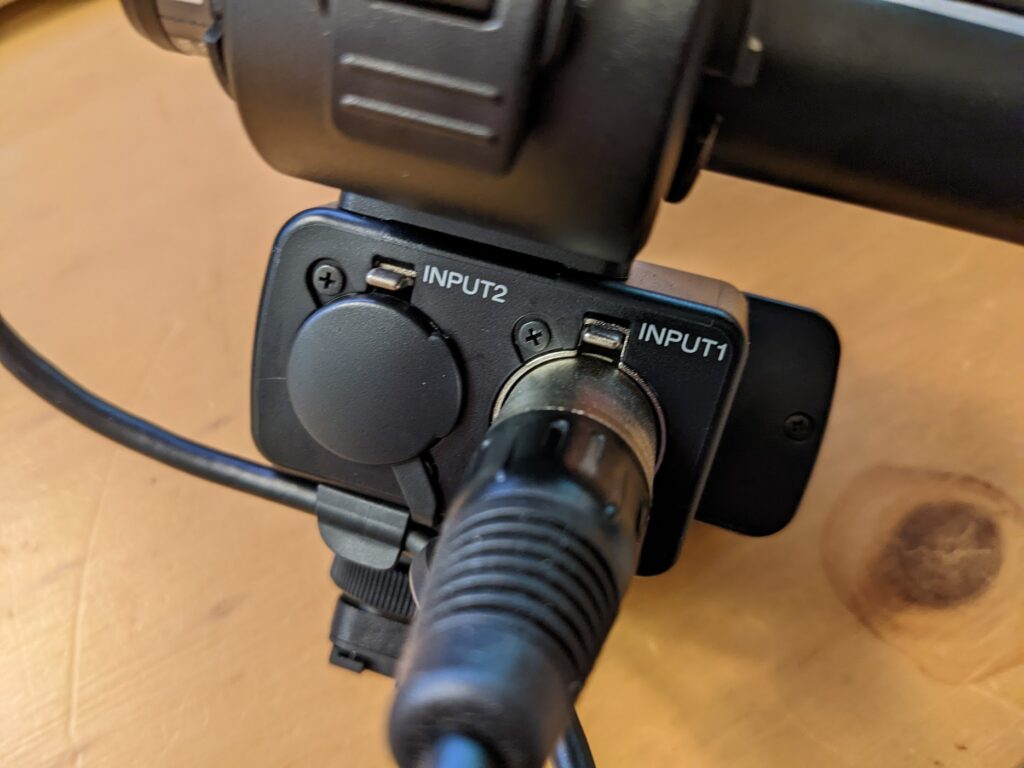
INPUT 1 / INPUT 2
- Sockets on the audio adapter for microphones. Some settings can be changed on a per-mic basis.
- Most Shoot Types use INPUT 1 only (see below)
-
REC CH SELECT
- “Record Channel Select” – This function chooses which of the two audio tracks the mic inputs are recorded on
- For abbywinters.com shoots, always set to CH1
- This setting never changes for any abbywitners.com Shoot Types
-
ATT
- Stands for “Attenuation”, how the incoming signal is automatically reduced (this is required with some types of mics or musical instruments)
- For abbywinters.com shoots, always set to the lowest reduction (most sensitive mic), 0dB for both INPUT 1 and INPUT 2.
- This setting never changes for any abbywitners.com Shoot Types
-
AUTO / MAN
- AUTOmatic or MANual gain control. The sensitivity of the mic is controlled by the knob (MAN), or by the electronics in the audio adapter (AUTO)
- This is called AGC, Automatic Gain Control. The electronics react in about 10 seconds to changes, and makes the mic less-sensitive if there are loud sounds. Similarly, during quiet periods, over about 10 seconds the sensitivity of the mic is increased automatically.
- This setting never changes for any abbywitners.com Shoot Types
- For abbywinters.com shoots use AUTO, for both INPUT 1 and INPUT 2.
- This setting never changes for any abbywitners.com Shoot Types, unless there is a creative imperative not to automate this (eg, recording ASMR-like material).
-
LINE / MIC / +48V
- We only use Sennheiser MKH-416 condensor microphones, which require 48+ volts to operate
- Set to +48v for all abbywinters.com shoots, for both INPUT 1 and INPUT 2.
- This setting never changes for any abbywitners.com Shoot Types
-
LOW CUT
- In theory, cuts out some wind noise (“rumble”). In practise, it is completely ineffective, and causes human voices to be recorded poorly.
- Set to off for all abbywinters.com Shoot Types, for both INPUT 1 and INPUT 2.
- This setting never changes for any abbywitners.com Shoot Types
The settings in the below image applies to all abbywinters.com Shoot Types.

Single mic input
For any abbywinters.com shoot that only has one mic connected to the audio adapter – Solo, GG, GB, GD, etc.

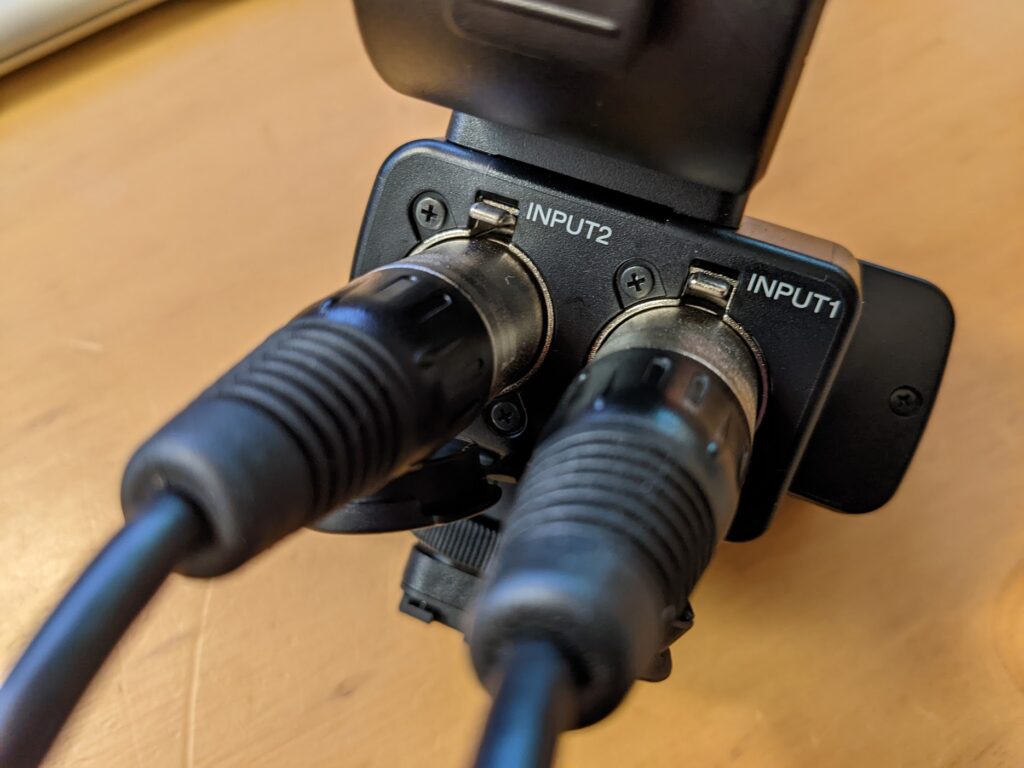
Two mic inputs
DIM and SIM shoots always have two mics conncted to the camera, one closer to the model, one further away (more info, Part 2 / IM Audio Setup). No settings need to be changed on the audio adapter when two mics are used. It does not matter which mic is connected to which input.

